


It took no less than six attempts to create a version I was truly happy with.
Why? Because every recipe I came across called for aquafaba meringue.
And since I like to challenge the “rules” and test what’s really essential –
I wondered if I could skip the meringue, like in some simple vegan cakes.
Turns out... not this time.

🧪 Tried Skipping It – Here's What Happened
Without aquafaba meringue, the result was flat, sticky, and heavy –
plus, it lacked the absorbency that makes ladyfingers so magical in tiramisu or espresso.
So I rolled up my sleeves (again) and got back to the basics –
playing with the ingredient ratios and refining the method step by step.

🥣 The Final Version – Balanced, Delicate, and Soaked Like a Pro
Here’s how I made it work:
📌 I added apple cider vinegar to the aquafaba to help stabilize the foam
📌 Gradually beat in sugar until stiff peaks formed
📌 Folded in a touch of oil, vanilla, and orange extract
📌 Mixed in a dry blend of flour, baking powder, and cornstarch
📌 Piped the batter into lightly greased silicone ladyfinger molds
📌 Dusted with powdered sugar and baked at 170°C (340°F) for about 20 minutes

⏱️ Cooling & Drying – The Make-or-Break Step
After baking:
- Let cool in the mold for 15 minutes
- Dust with more powdered sugar (optional, especially if using in tiramisu)
- Transfer to a wire rack for full cooling
- Cover with a mesh tent and leave out overnight to dry

💡 Tip:
Avoid storing them in an airtight container – they’ll get soggy.
Only make what you’ll use in the next day or two for best results

💛 Why You’ll Love Them
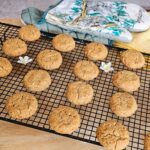
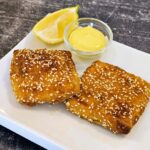
- Lightly crisp on the outside, soft and spongy inside
- Fully plant-based, no eggs or dairy
- Soak up espresso or cream like a dream
- Perfect for tiramisu, zabaglione, or any dessert that needs a good dip
- And most importantly?
You made them from scratch – and that deserves a real grown-up treat.

🤖 PJ says:
Get ready to fall in love – that first espresso-dipped bite does the rest. ☕
Enjoy, and let me know how it turned out 😋❣

RECIPE
Vegan Ladyfingers (Savoiardi)EQUIPMENT


16 units about 11 cm long (6.3-Inch)
- 1⅔ cups all-purpose flour 200 grams
- 2 Tablespoon corn starch
- 1 teaspoon baking powder
- ½ cup chickpea water from a can
- 1 Tablespoon apple cider vinegar
- ¼ teaspoon salt
- ½ cup sugar
- 2½ Tablespoon oil
- ¼ cup un-sweetened plant-based milk
- 1 teaspoon pure vanilla extract
- ½ teaspoon orange peel extract or almond extract
- 2 Tablespoon powdered sugar
- Lightly oil the two ladyfingers molds, a total of 16 units; spray or brush with oil and place the molds on a baking tray.* (see note at the end of the recipe)
- Sift flour, cornstarch and baking powder into a deep bowl, mix with a fork and set aside.
- Pre heat the oven to 170 degrees Celsius - 338 Fahrenheit.
- Pour the chickpea water into a deep bowl, preferably metal, and start whipping at low speed (so it does not splash) for a few seconds until it becomes airy and white.
- Add vinegar and salt and continue to whip for a few more seconds. Increase to the highest speed and add sugar gradually while whipping. This should take about two minutes. Occasionally, stop the mixer to scrape the sides with a spatula.
- Continue whipping at high speed until you get a stiff meringue - so when you turn the bowl over - the meringue does not fall.
- Reduce to low speed, add oil, milk, and extracts, and mix for a few seconds. Add the flour, one tablespoon after the other, until combined - still at low speed.
- Transfer the mixture to a piping bag and cut the end to a size of about 1 cm (about half an inch). Pour the batter evenly into all the recesses. The batter should not fill the recesses but reach about one-third of the height. Sprinkle powdered sugar to cover.
- Put in the center of the oven, along with the metal tray, and bake for 20 to 25 minutes until the cookies are golden and start to brown at the edges. Take out and let the ladyfingers cool in the pan for about fifteen minutes. At this point, the cookies will still be quite soft. After the cookies have cooled, remove them from the mold and place them on a wire rack. (in my oven, it took 25 minutes)
- As the cookies cool, the top will harden, and the rest will be softer. You can sprinkle more powdered sugar, but it is unnecessary. Now, dip them in espresso or vegan Zabaglione or make tiramisu. (recipe coming soon).
- Storage: Unlike other cookies - it is not recommended to store the ladyfingers immediately after they have cooled - they may accumulate moisture, damaging their crispy coating. Instead, leave them on the wire rack in the open air for about twenty-four hours and cover it with a food umbrella - to keep flies away. You can store them only after the cookies have dried a little.

- The ladyfingers will keep for several days at room temperature. It is recommended to make a small amount, only what is needed for use shortly.
- Instead of baking the ladyfingers in silicone molds, you can bake them directly on a baking tray lined with paper. Keep a distance of at least 4 cm (1.5 inches) between each unit. I prefer to work with ladyfingers silicone molds.


Leave a Reply