


Watch Demonstration Videos Below

If 8 years ago I was told that it is possible to make a vegan fried egg - I would have laughed in disbelief! But it turns out (over and over again) that culinary creativity transcends all imagination and does what in the first place seemed "absolutely impossible"!
Like all the difficult and complicated challenges, once the solution is found -we ask in amazement - how come no one has thought of it before? Same as it happened, for example, with the Vegan Meringue (made of chickpea water). Often the pinnacle of genius lies precisely in simplicity - in the ability to discern what others do not see; In the possibilities that lie before our very eyes without us noticing.

This recipe is for those who miss fried eggs and are willing to spend time learning and practicing the technique of creating a Yolk Membrane. Making the Egg White is very simple - it is quite similar to these of crepes and pancakes.
The good news is that I did the "trial and error" for you; I simplified the technique and came up with a precise formula that is not subject to the whims of luck.
Before you panic - if I can make it - you probably can too! it only seems complicated - but after acquiring the technique of creating the yolk membrane - it's easy - I promise you!
The recipe itself is not difficult to make - Practice is the name of the game! Indeed, if you take it as a game - or a kind of pastime it's actually fun.
To create the yolk membrane - so it can be pricked or broken when dipping bread or Challah -
we need ingredients from Molecular Gastronomy: Sodium Alginate, and Calcium Chloride.
Some of the ingredients can be purchased online; They will keep in the pantry or fridge for a long time; You only need a little for each time.
In molecular gastronomy, there are two methods for creating the yolk membrane:
There is the Spherification Method - in which Sodium Alginate is added to the yolk mixture and soon after dipped in a Calcium Chloride Solution.
This method makes a delicate & fragile membrane, it requires extra care and dexterity of hands and is not very similar to the original yolk.

The second method is called Reverse Spherification - in which, naturally, the process is reversed: We put the Calcium Chloride in the yolk sauce - and then dip the yolk sauce in a Sodium Alginate Solution.
This method yields a beautiful shiny yolk, very similar to the original. However, the taste of the yolk is terrible to my taste - It appears the Calcium Chloride (or Calcium Lactate) gives the yolk a bitter taste and unpleasant burning on the tongue.

A search online revealed - I was not the only one who felt a bitter taste! Someone suggeste replacing the calcium chloride with Calcium Lactate-Gluconate, which is completely tasteless.
The problem was, this ingredient is hard to find! After a long search, I found only one vendor who sells it - but shipping was terribly expensive.

Since I was determined - I ordered anyway! Well, I had to crack the egg 😉
In the meantime I continued with the experiments till my head turned like a spinning-top: When I was sure that the yolk is actually dancing the Tango with me: one step forward and two backward - an idea suddenly popped up:
"Wait a moment Sara'le" - I called out loud - "Why not combine the two methods? Ahhh?"
Why not try a Double Spherification? Start with the Spherification Method - dip the yolk sauce containing Sodium Alginate in a Calcium Chloride Solution and then continue according to the Reverse Spherification Method - dip it in a Sodium Alginate Solution?

I stormed the kitchen with renewed vigor, and on the way simplified a few steps. This time I was leaving nothing to the whims of fate - I worked with a timer!
What can I tell you - after a long and tortuous journey of trial & error I finally came up with an orderly formula; It actually worked!
Are you still there??? Let's get started! 😉
📌 Loved the recipe? Give it some stars! ⭐⭐⭐⭐⭐
It really helps boost the blog – and gives me the inspiration to keep creating delicious things 💛

RECIPE
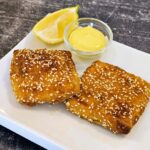
Eye for an Eye - Vegan Fried EggEQUIPMENT


Egg Yolk
Sodium Alginate Solution
- 1000 ml water
- ½ tablespoon sodium alginate
Calcium Chloride Solution
- 400 ml water
- 1 teaspoon calcium chloride 6 grams
Rinse Bath
- 1000 ml water
Egg Yolk Sauce
- 1 tablespoon nutritional yeast flakes
- ½ teaspoon sodium alginate
- ⅛ teaspoon paprika
- ⅛ teaspoon ground turmeric
- ⅓ cup un-sweetened plant based milk almond milk or soy milk
- ⅓ cup water
- 3 Tbs vegan butter
- ¼ teaspoon black salt add after removing from heat
- ¼-½ teaspoon annatto oil optional, adds a beautiful deep yellow-orange color
Egg White
- 300 grams firm silken tofu may also use extra firm
- 5 tablespoon sweet white rice flour
- 1 tablespoon corn starch
- 3 tablespoon olive oil
- 1 teaspoon agar agar powder
- ½ cup water
- ¼ teaspoon black salt optional
Early Preparation
Prepare the Sodium Alginate Solution in advance
- Mix the water with the sodium alginate in the blender for a few minutes until homogeneous. Transfer to an airtight container and refrigerate for at least an hour to remove the bubbles. Remove from the fridge early enough so it will reach room temperature. The Alginate Solution can be prepared a few days in advance.
Egg Yolk Sauce
- In a small bowl mix all the dry ingredients, except the black salt and set aside.
- In a small saucepan melt the butter slowly over low heat.
- Add the dry ingredients except the black salt and mix well.
- Add water and milk gradually while stirring, increase to medium heat.
- Cook the mixture until it’s almost boiling, but make sure it doesn’t actually come to a full boil. The texture should be liquid, reminiscent of the smooth and glossy consistency of a runny fried egg yolk. Remove it from the heat.
- At this point if desired, add annatto oil gradually until the desired color is obtained. Please note that even without Annatto you will get a beautiful yellow color. Annatto oil gives the yolk a beautiful yellow-orange hue.
- Add the black salt and mix well.
Calcium Chloride Solution
- Pour water into a bowl - so you can work comfortably.
- Add the Calcium Chloride to the bowl and mix well until the calcium chloride dissolves.
Sodium Alginate Solution
- If you haven't done it earlier - take out the sodium alginate solution from the fridge at least an hour in advance - so that our precious yolks don't catch a cold 🙂
Spherification
Prepare In Advance
- Transfer the yolk sauce to a measuring cup - like OXO - it will be more convenient.
- Arrange side by side the Calcium Chloride Solution, the Sodium Alginate Solution and the rinsing bath.
- Keep at hand: measuring tablespoon, a standard tablespoon and a timer.
- Creating The Membrane: Dip the measuring spoon into the calcium solution, allowing a few drops to remain in the spoon. Next, pour the yolk sauce into the spoon. Don't fill it to the top. Gently place the spoon in the calcium solution, holding it vertically so that the spoon’s surface faces upward. Keep it submerged for a few seconds until you observe the yolk beginning to stabilize. Finally, release the spoon gently..
- Using a standard spoon, turn the yolk carefully so that it is evenly coated with the solution. Do not touch the yolk directly, but "make waves" around it - push the surrounding solution with a regular spoon
- Leave the yolk in the Calcium Solution for a few seconds; Don't leave it in the solution for more than a total of one minute.
- It requires some practice - but don't worry - after several attempts, you too, will acquire the technique - I promise!
- Using a standard spoon carefully remove the yolk from the calcium chloride solution, Make sure to drain the rest of the calcium chloride solution from the spoon, so that only the yolk will remain in the spoon without any liquids, then gently transfer it to the Sodium Alginate solution. Don't touch the yolk directly, but "make waves" around it - pushing the surrounding solution with a standard spoon until the yolk flips, and evenly coated with the alginate solution.
- Leave the yolk in the Sodium Alginate Solution for a few seconds, up to a minute - no more.
- Please note: It is essential, at least initially to work with a timer. Otherwise, the yolk may thicken/harden too much. On the other hand, too little time will not be enough to create a sufficiently durable membrane.
- Gently transfer the yolk, using a standard spoon to the pre-prepared rinse bath, to wash away the excess solutions. Turn carefully to wash it off all sides. Keep the yolks in the water until use. It is not recommended to leave them in the water for more than an hour - they may lose their texture.
Egg White
- Mix the egg white ingredients in a blender and set aside.
Frying The Egg
- Heat a non-stick pan with some olive oil on a medium heat.
- Add 2 tablespoons of the egg white mixture and flatten gently with the back of a spoon.
- Frying takes longer than a normal egg - fry for about 2 minutes, until the egg white slides easily on the pan and fry for another 30 seconds.
- At this point you can flip the egg yolk if you want: slide it on to a large spatula, and flip it back to the pan. fry for another minute.
- Take the yolk we prepared earlier from the rinse bath and place it gently (with your hands) in the center of the egg white in the pan.
- To stick the yolk to the egg white - put a small teaspoon of the egg white mixture and "glue" it around a small part of the yolk -watch the video.
- Cover and fry for about another minute; then, gently, using a wide and flexible spatula, slide it onto a serving plate.
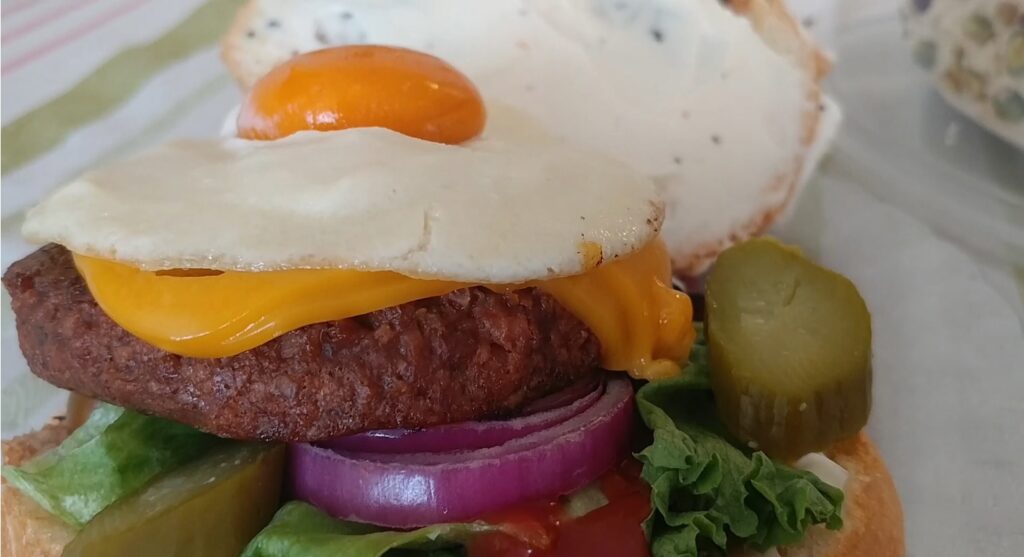
- You can place the fried egg on burgers, toasted buns, shakshuka etc.
- Now you can finally eat it (you earned it!) and thank the God of Veganism for the wonder 🙂
- The white sauce and the yolk sauce will maintain their texture for approximately two days when stored in sealed containers in the refrigerator. However, Before beginning the spherification process, warm the chilled yolk sauce to return it to a liquid state.”
Vegan Fried Egg Video

Vegan Egg White Video

Basic Vegan Yolk Sauce Video

How To Make Egg Yolk Using Double Spherification Method


Lee says
how do you serve hot?
Sara Dagan says
it's described in the recipe. I will soon post a demonstration video